セクショナルガレージドアの設置に取り組むのは少々気が引けるかもしれませんが、一歩ずつ進めていけば、管理可能で、やりがいのある週末プロジェクトだと感じられるでしょう。ガレージドアをアップグレードすることは、日常の利便性を高めるだけでなく、家に新鮮な外観をもたらし、事前の準備作業が時間とコストの節約に大きく貢献します。このガイドでは、必要な工具、ガレージの準備方法、そして段階的な手順という、プロセスを明確で管理しやすい単位に分割しています。最後のパネルを所定の位置に固定する頃には、ショールームからそのまま届いたようなドアが完成し、請負業者は不要です。これは、これまでに住宅改善プロジェクトに挑戦したことのない方に最適です。さあ、始めましょう!
セクショナルドアとは何か、そしてその利点は?
セクショナルドアは、互いに蝶番で連結された複数の水平パネルで構成されており、折り畳まれながら真っ直ぐ上昇し、天井スペースに格納されます。この設計により、車路や天井のスペースをほとんど取らず、わずかなスペースも有効活用したい場所に最適です。際立った特徴としては、衝撃や天候に耐える長持ちする構造、ガレージの温度管理を可能にする断熱オプション、そして侵入を防ぐ頑丈なロックシステムが挙げられます。標準的な箱型から特殊な形状まで、あらゆるガレージサイズに適合可能です。住宅所有者は、スチール、アルミニウム、木材から選択でき、さらに多様な色、質感、装飾スタイルが用意されており、あらゆる住宅デザインに調和します。.
セクショナルガレージドアの定義
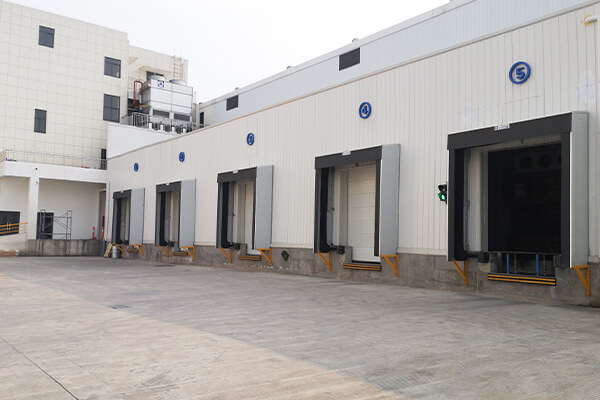
セクショナルガレージドアは、洗練されたデザインと効率的な操作を重視する住宅と商業施設の両方で標準的な存在となっています。各ドアは、蝶番で屈曲する複数の水平セクションで構成され、天井の下で頂点に達するレールに沿って上方にスライドします。この上方向への移動により、車路全体がクリアに保たれ、床のレイアウトが維持されるため、回転半径が狭い場所や、駐車スペースがガレージに隣接している場合に有利です。最近の業界レポートでは、これらのドアへの嗜好が高まっていることが示されており、その主な理由は、多層構造(多くの場合、硬質ポリウレタンコアに結合されたスチールシェル)が、特に商業用ガレージドア用途において優れた熱性能を提供することにあります。安全性の向上も魅力の一つです。補強されたパネルと耐タンパー性ロックが侵入を防ぎます。最後に、モジュール構造により、色、質感、窓のパターンを調整して様々な建築様式に調和させることができ、柔軟でエネルギー効率の高い選択肢としての評判を確固たるものにしています。.

セクショナルドアの一般的な利点
- 強化された断熱性とエネルギー効率
セクショナルガレージドアは、その気密性の高い構造で高く評価されています。通常、スチールまたはアルミニウムで形成され、パネル間に高密度のポリウレタンまたはポリスチレンが挟まれており、効果的な熱障壁として機能します。業界の数値によると、適切に密閉・断熱されたセクショナルドアは、冷暖房のエネルギー使用量を最大20パーセント削減でき、光熱費の直接的な削減につながります。.
- 省スペース設計
追加のクリアランスを必要とする従来のスイングドアとは異なり、セクショナルドアは真っ直ぐ上昇し、天井の下にきれいに格納されます。この垂直動作により、車路が解放され、ガレージ内部の頭上スペースが増えるため、狭い敷地や低全高の車両、あるいは天井収納に最適です。.
- 耐久性と長寿命
耐久性と長寿命.
- 溶融亜鉛メッキ鋼板または頑丈なアルミニウムで製造されたセクショナルパネルは、長期間にわたってへこみや錆びに耐えます。定期的な注油と、レールやスプリングの時折の点検を行うことで、住宅所有者はこれらのドアが15年から20年以上にわたって確実に動作し、長年にわたる低コスト運用を実現できると期待できます。
高度なセキュリティ機能.
- 補強構造、耐タンパー性ヒンジ、オプションのスマートロック統合により、セクショナルドアは追加のセキュリティレベルを提供します。ホームセキュリティ協会の調査によると、これらのドアは、スイング式やチルトアップ式の設計と比較して、不正侵入の可能性を15パーセント低下させることが確認されており、不動産所有者に安心感を与えます。
美的魅力とカスタマイズ性.
- 今日のセクショナルドアは、非常に多様な仕上げ、パネルスタイル、色で提供されており、あらゆる住宅に完璧に合わせることが容易です。所有者は、リアルな木目調の表面や印象的な現代的な色合いから選択でき、ドアが全体的な建築様式を補完し、玄関の存在感を高めることを保証します。
騒音低減.
- 多くのメーカーは、セクショナルドアに高級ナイロンローラーやゴム製レール、さらに断熱セクションを採用し、開閉時の騒音を最小限に抑えています。この利点は、住宅が密集した地域や、ガレージを頻繁に出入りする家庭で特に高く評価されています。
スマートテクノロジーとの互換性.
現在のセクショナルドアモデルは、ホームオートメーションシステムとの完全統合を頻繁にサポートしています。住宅所有者は、ソファからドアを開閉したり、音声アシスタントにコマンドを話しかけたり、最後の家族が出発したときに自動的に閉まるように設定したりできます。調査によると、消費者の57%が日常生活を効率化するためにこれらのスマート機能を備えたガレージドアを求めています。.
セクショナルドアの一般的な利点
使いやすさ、エネルギー節約、視覚的魅力を融合させることで、セクショナルガレージドアは世界中の住宅物件にとって好まれ、賢明な選択肢であり続けています。.
住宅所有者がセクショナルガレージドアを愛する理由は、現代の生活にぴったりと合致する多くの点にあります。まず第一に、真っ直ぐ開く方法は、車路やガレージのスペースを無駄にしません。これは、最後の瞬間の食料品の積み込みに最適です。次に断熱性です。エネルギー効率の高いガレージに関する最新の記事では、人々がガレージを家の他の部分と同じ温度に保つことを非常に重視していることが示されています。断熱性の高いセクショナルドアはこれを助け、冷暖房費を削減します。安全性の面では、頑丈なパネルと確実なロックシステムにより、望まない訪問者の侵入を困難にし、心配事を一つ減らしてくれます。人々はまた、見た目の良さについてもますます求めており、セクショナルドアは素材、色、仕上げの豊富なメニューで応えています。個人のスタイルに合い、スマートホームシステムと連携するドアの検索が急増していることから、カスタマイズ性とテクノロジーへの関心が希望リストの最上位にあることがわかります。
他のタイプよりもセクショナルを選ぶ理由は?.
| セクショナルガレージドアは、その耐久性、省スペース性、カスタマイズ性、断熱性、そしてスマートテクノロジーとの互換性により好まれています。 | 重要ポイント. |
|---|---|
| 耐久性 | 設置されるガレージドアの詳細は、その性能に大きな影響を与える可能性があります。. |
| 長持ちする堅牢な設計。. | 省スペース性. |
| 動作に最小限のスペースしか必要としません。 | カスタマイズ性. |
| 断熱性 | 幅広い素材と仕上げ。. |
| 断熱性 | 優れた熱効率を提供します。. |
スマートテクノロジー
現代のスマートシステムと互換性があります。
セクショナルドアの種類.
| セクショナルガレージドアは、その耐久性、省スペース性、カスタマイズ性、断熱性、そしてスマートテクノロジーとの互換性により好まれています。 | 住宅用 vs. 産業用セクショナルドア | 産業用 |
|---|---|---|
| 住宅用セクショナルドアは住宅向けに設計され、美観と便利な操作性を優先する一方、産業用セクショナルドアは過酷な使用に耐えるよう構築され、耐久性と機能性に重点を置いています。 | 住宅用 | 設計 |
| スタイリッシュな仕上げ | 機能性 | 使用用途 |
| 動作 | 軽負荷 | 高負荷 |
| 静かでスムーズ | 堅牢な機構 | 素材 |
| 断熱性 | 軽量 | 高効率 |
| 高強度 | 中程度の効率 | サイズ |
| 標準サイズ | カスタマイズ可能 | 自動化 |
| 耐久性と安全性に優れ、特に厚手のスチール | スマート対応 | 耐久性のあるシステム |
手頃な価格
より高い投資.
各タイプの主な特徴
住宅用と産業用ユニットの核となる特性を見ると、それぞれが特定のニーズを満たしつつも、継続的な技術革新のおかげで境界領域で融合していることがわかります。住宅用製品は、スタイル、直感的な制御、費用対効果を優先し、過剰な支出をすることなく日常の家庭の需要に適した確かな性能を提供します。対照的に、産業用バリエーションは、頑丈な部品、モジュールオプション、高度な合金を採用し、広範な生産ラインを動かすために、絶え間ない結果を出すように設計されています。最近のGoogleトレンドデータは、住宅用の使いやすさと産業用の頑丈さを兼ね備えたハイブリッド製品への需要の高まりを示しています。現在登場しているモデルは、耐圧試験済みの筐体とスマートオペレーティングシステムを備えており、フレックスオフィスや住居兼仕事場のスペースを求める起業家を魅了しています。環境性能も必須事項として浮上しており、購入者は両方のシリーズにおいて、優れた断熱性とリサイクル材料または低排出材料を求めています。
- ニーズに合った適切なセクショナルガレージドアの選び方
住宅やビジネスに適したセクショナルガレージドアを選択することは、形状、機能、そして長期的な節約を融合させることです。最近の調査によると、セクショナル設計は、その巧妙な上昇移動パネルによって車路と天井スペースの両方を解放するため、住宅所有者と施設管理者の両方から支持を集めています。長期的な耐久性、最高レベルのセキュリティ、あるいは外観の魅力のどれを主な関心事としても、以下の点を考慮してください。.
- 断熱とエネルギー効率
素材オプション.
- Automation and Smart Integration
Annual growth in smart garage doors is now exceeding 25%, fuelled by a desire for both convenience and security. New models feature built-in Wi-Fi, smartphone control, and motion sensing, permitting users to open, close, and surveil the space from anywhere. Notifications alert of activity, creating a sense of security even from afar.
- 安全機能
Modern sectional doors now come with pinch-resistant panels and tamper-proof locking. Check for compliance with UL 325, the prevailing safety standard, which mandates automatic reversal on obstruction and other critical safeguards. Doors meeting these requirements minimize risk for children, pets, and vehicles.
- Style and Customization
Homeowners can tailor sectional doors with a range of finish, panel, and window configurations to harmonize with any façade. Manufacturers offer powder-coated colors and textured surfaces, enabling a perfect match, whether the residence is sleek modern or classic colonial.
- Budget and Longevity
While prices for sectional garage doors can range from $700 for basic models to over $3,000 for high-end, customized solutions, investing in quality ensures long-term performance. Opt for brands with robust warranties, as premium doors often last over 15 years with routine maintenance.
Selecting the ideal sectional garage door begins by clarifying your unique needs and matching them with the latest innovations and styles available today. Consider the size of the opening, insulation requirements, safety features, and the architectural language of your home. By weighing these elements, you’ll arrive at a door that not only operates smoothly and protects your belongings but also elevates the overall look of your residence.
Why This Guide Matters for Your Project
適切な設置の重要性
Getting the sectional garage door put in the right way matters for its performance, its lifespan, and most of all, for security. If the door is off-level, the tracks will wear quicker, the electric opener will struggle, and small gaps may let in unwanted guests. Once you add smart locks and high-efficiency insulation, those features only perform well when the door hangs straight. Hiring an experienced installer cuts the odds of sudden bangs or misthreads, protects what you’ve spent, and meets the safety codes that change from region to region. When you make the right installation the first step, you set the stage for trouble-free use for years ahead.
Common Mistakes to Avoid
- Skipping Regular Maintenance
Too many homeowners wait until they hear a thump or feel a jerk to check the garage door. Missing the quarterly visual check—tightening bolts, cleaning the track, and listening to the springs—means small problems grow into bent tracks and burnt-out openers. A few minutes every three months costs far less than one emergency service call and gains you locking peace of mind every time you pull in. Keeping the existing garage door serviced keeps its glide smooth, its sensors sharp, and its lifespan measured in years rather than months.
- Improper DIY Repairs
Fixing garage doors without the right tools or specialized know-how can create more trouble than you started with—plus you might put yourself in harm’s way. When the issue involves springs, cables, or the opener itself, it’s always better to call in the pros. They’ll get the door running right and keep it safe to use.
- Ignoring Signs of Wear
It’s easy to write off a creaky hinge, a pause before the door starts to move, or a frayed cable as minor. Let these signs pile up, though, and you’ll pay for it later. A quick look and a small fix today can spare you a costly repair or a full door replacement tomorrow. Catching trouble early keeps everything working smoothly.
- Choosing the Wrong Door Material
Not all garage doors are built to survive the climate you live in. If you go with wood in a rainy area, you’ll be fighting rot. Pick metal for a coastal spot and you’d better guarantee it’s rustproof. Finally, be honest about how you use the door—heavy traffic or light—so the material can keep up without failing early.
- Neglecting Proper Insulation
A door that flaps in the cold does more than chill the garage; it jacks up your heating bill, too, especially if the garage is under or beside your living space. Insulated doors pay back in comfort and cost every month, making it a wise upgrade.
Steering clear of these mistakes will keep your garage door working great, looking sharp, and—most importantly—safe for everyone who uses it.
Benefits of Following a Comprehensive Guide
- Improved Energy Efficiency
A carefully crafted guide directs you in selecting insulation grades and sealants that cut air leaks, resulting in a door that regulates indoor temperatures more effectively. Research shows that insulated designs trim energy bills by 15 to 20 percent throughout any season, making them a smart choice for a garage door company.
- Enhanced Durability and Longevity
The right choices—like corrosion-resistant tracks and heavy-duty springs—combined with a preventative mindset, steer you away from common pitfalls when working with standard sectional doors. Adherence to best practices can push a door’s life expectancy to the higher end of the 15 to 30-year spectrum that manufacturers promise.
- Cost Savings
Spending a little time on proper setup and periodic checks pays off. When you identify misalignments, noisy rollers, or weakened springs early–in the way a guide instructs–the small repair today sidesteps the expensive emergency tomorrow, potentially lowering the average annual repair bill by several hundred dollars.
- Improved Safety Features
A good guide never skips over safety upgrades. Outlining where to mount photoelectric sensors, how to adjust photo-eye alignment, and what type of tamper-proof locks to choose protects both the door’s operators and the home’s perimeter without needing upgrades later.
- Aesthetic Appeal and Increased Home Value
The right door does more than function; it frames the front of your home. When material, finish, and hardware are harmonized according to a dependable outline, the resulting look can elevate perceived value and actual resale price by a reported 2 to 4 percent, according to real estate analysts.
Overview of the Installation Process

Essential Components of Sectional Garage Doors
Sectional garage doors are built from several critical parts that blend strength, performance, and longevity. The heart of each door consists of horizontal panels made from steel, aluminum, or engineered wood. These materials provide differing levels of thermal resistance and toughness tailored to the door’s intended use. The panels are fastened together with hinges that allow them to flex and roll smoothly along a horizontal and vertical track system when the door is opened or closed. The tracks themselves are vital for keeping the panels aligned and regulating the door’s travel.
Whether a system uses torsion springs mounted above the header or extension springs along the horizontal tracks, these energy-storing devices are crucial for aiding lift and lowering the door, reducing the load on the opener. Rollers sealed within the hinges travel within the tracks to produce quiet, steady motion. A replaceable vinyl weather seal along the door’s bottom edge serves to block water, wind, and small debris. Many contemporary sectional doors are also equipped with plug-in powered operators and photo-eye safety beams that enhance convenience and prevent accidents, all while minimizing thermal load on the garage. These combined elements yield a resilient, efficient door suitable for homes and light-commercial installations.
Step-by-Step Overview of the Installation Process
1. Preparation and Measurements
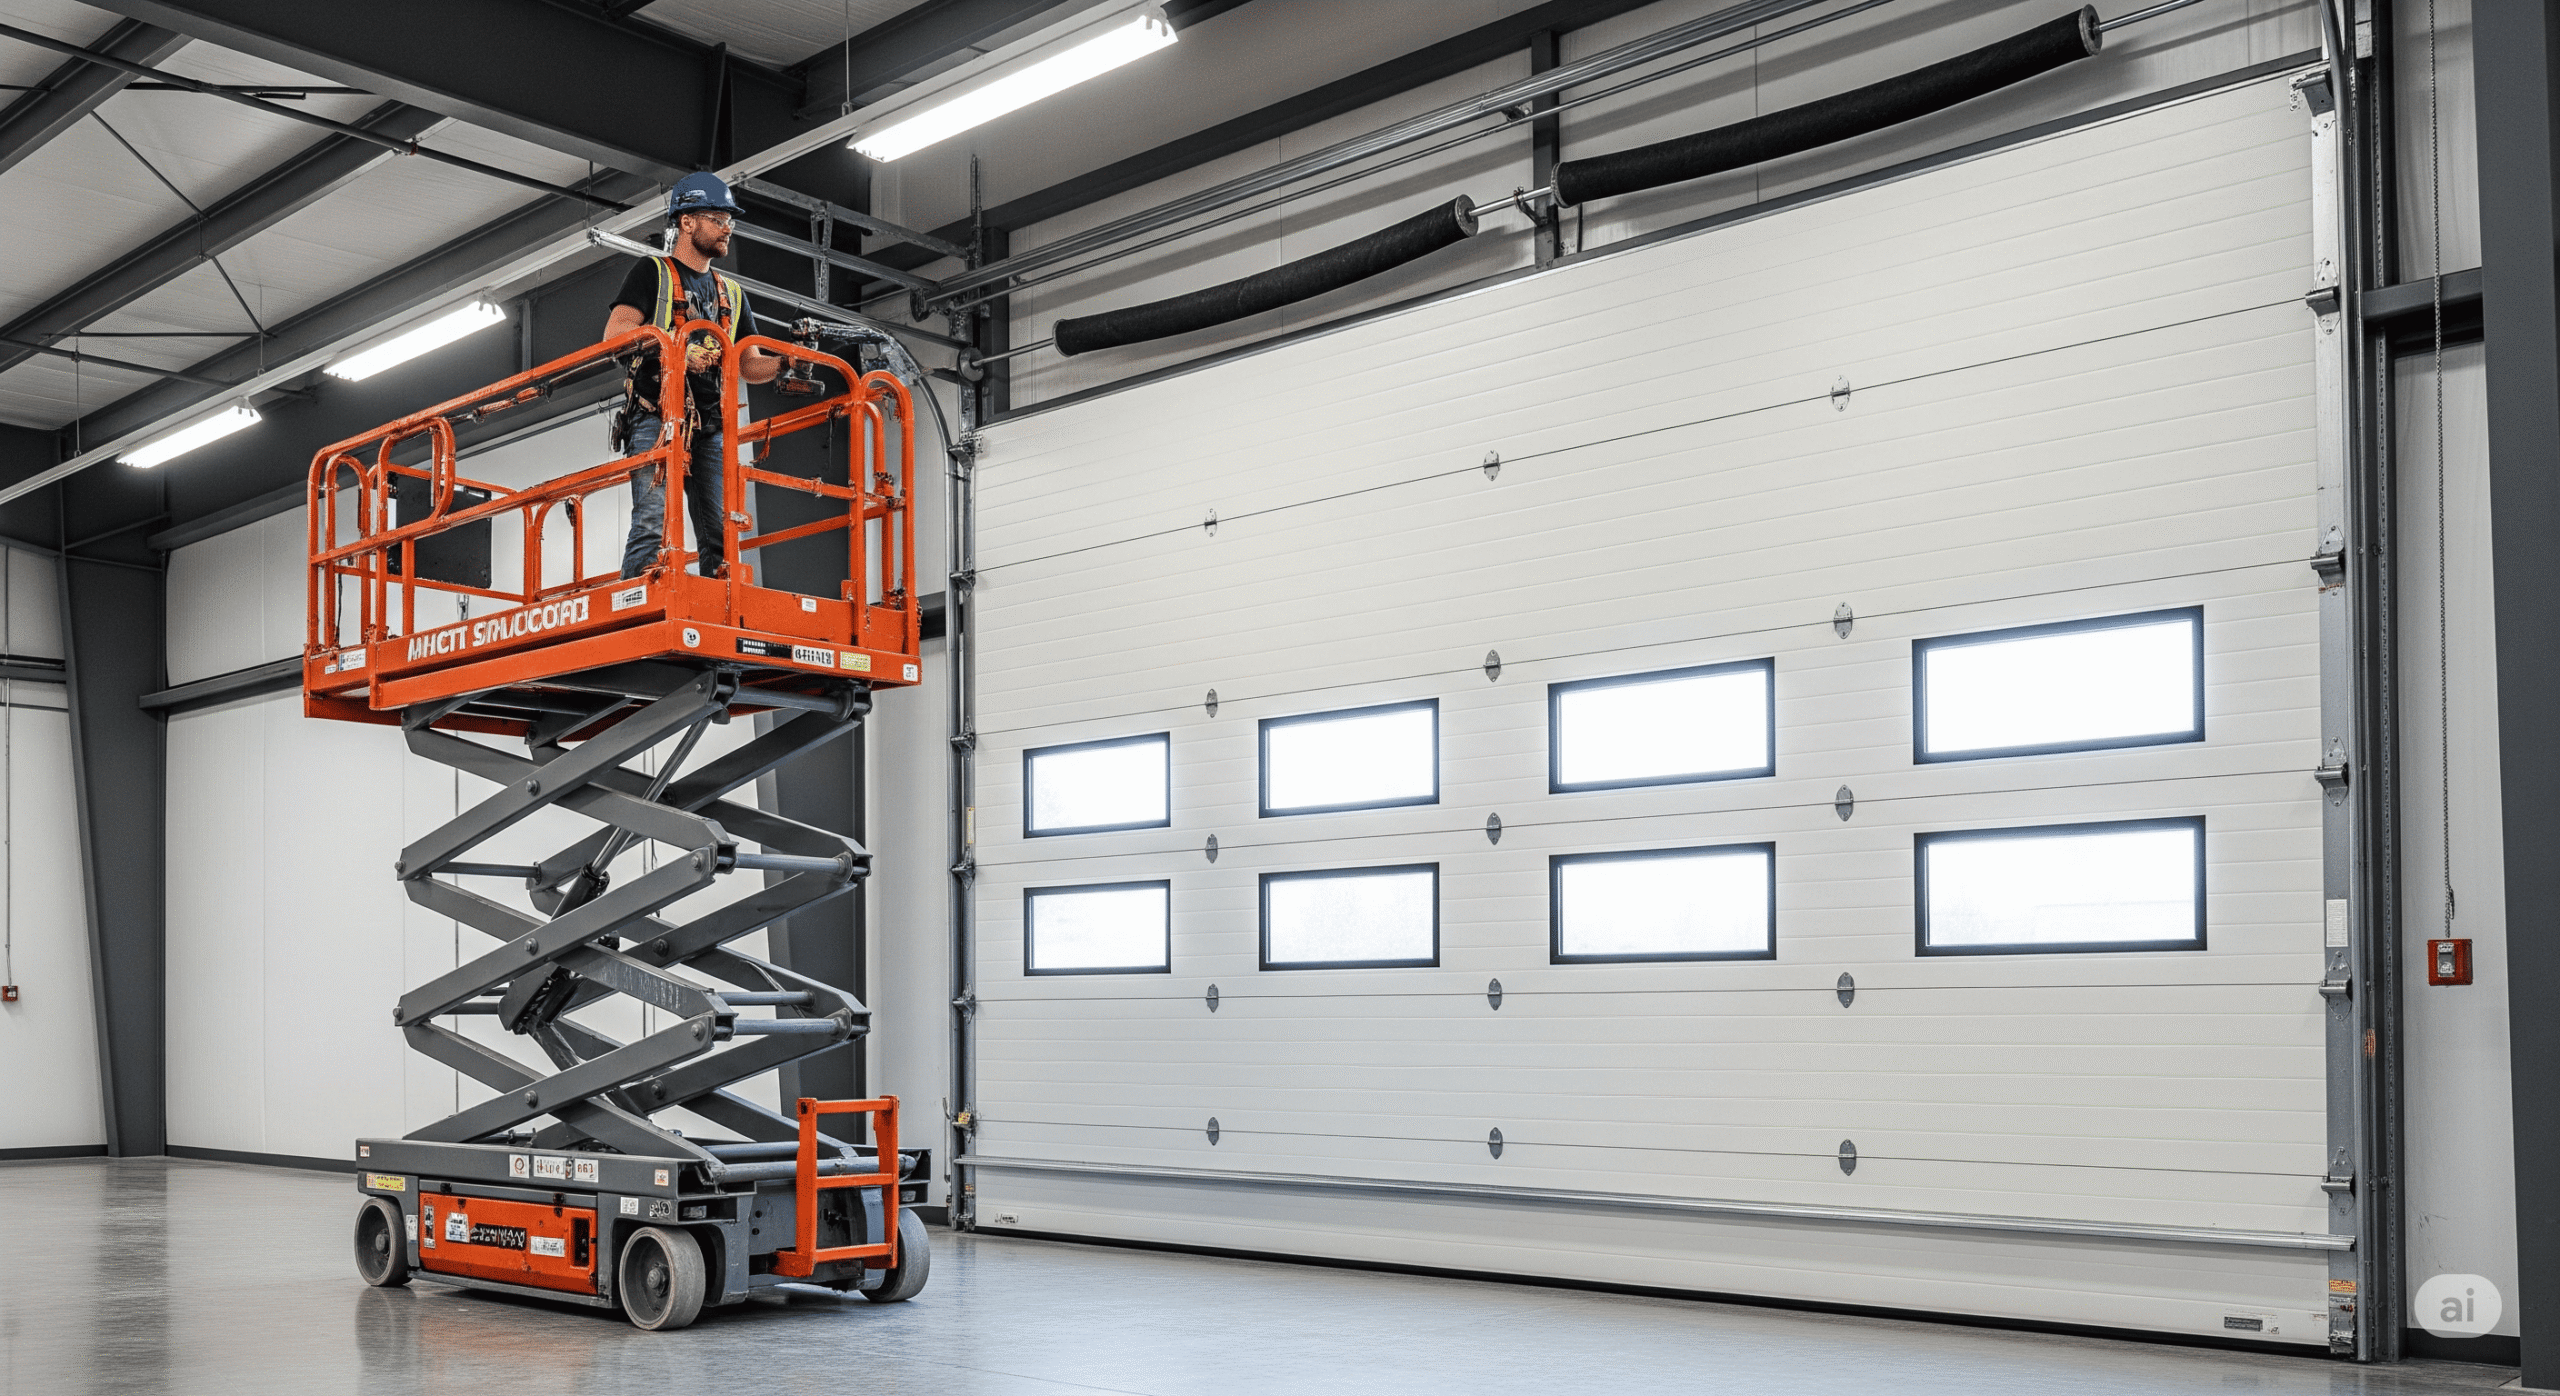
Before anything else, take a good look at the garage opening. Make sure the frame is solid and can handle a sectional garage door. Measure the width, height, and depth of the opening with care. Most sectional doors need 10 to 12 inches of headroom above the opening, so check that you have enough room. Gather all the tools you’ll need for installing a garage door: a tape measure, level, power drill, and ladder. Finally, clear the area around the opening so you can work without tripping or reaching around obstacles.
2. Install the Track Assembly
Begin with the vertical tracks. Position them so their edges line up perfectly with the opening, then fasten them with lag screws into the framing or studs. Next, connect the horizontal tracks to the vertical ones, angling them upward just enough to let the door glide up and down smoothly. Reference guides from the installation industry highlight the importance of this alignment; even a small error can cause the door to bind or wear out faster than usual.
3. Assemble and Position the Panels
Sectional garage doors come in stacked panels joined by hinges. Start by placing the lowest panel squarely in the doorway and verifying that it sits perfectly level. Use angle brackets or clips to hold it in position. Next, lift each successive panel and connect it to the next via the built-in hinges. When fastening the hinge bolts, use a torque wrench to snug them, being careful not to overtighten, as this can cause the metal or fiberglass to deform.
4. Attach the Spring System
Choose either a torsion system mounted above the door or extension springs that run the length of the track. Follow the specific directions provided by the door manufacturer, since the energy stored in a wound spring can cause injury if released unexpectedly. If you’ve never worked with spring counterbalances, put down the toolbelt and call a certified technician—life data shows that most spring injuries occur in amateur installations, and a few dollars for labor can save a lifetime of regret.
5. Install the Weather Seals
Fit a replaceable vinyl or neoprene seal along the bottom edge of the door and along the vertical and horizontal garage opening. These strips close the gaps that let rain, wind, and critters invite themselves inside. Today’s seals flex with temperature swings and hold up against sun and ice, which means you might replace them only once every few years instead of every season. A tight seal not only keeps the garage dry, it lowers heating and cooling costs by reducing air leaks.
6. Add the Automatic Opener
To add autonomous control, follow the opener’s manual to position it against ceiling rafters. Bolt it firmly to the joists, then link the door with the supplied brackets and connecting arm. Make sure the drive type matches the door’s weight and dimensions. Choosing a model with built-in safety sensors is a best practice for increased protection.
7. Test the Door
Once everything is hooked up, cycle the door several times and listen for anything out of the ordinary. Watch for lopsided travel or strange sounds. Level the track, tweak the spring tension, or recalibrate the opener until the movement is flawless. To keep it running well, lubricate rollers and hinges every six months.
Latest Statistics on Installation Efficiency
A 2023 survey found that trained installers usually finish a sectional door in 3 to 6 hours, while do-it-yourselfers often spend 8 hours or more. Taking accurate dimensions and using premium materials at the outset minimizes snags, leading to reliable operation and a long service life.
Key Points to Consider During Installation
- Accurate Measurements are Crucial
Before you lift a single panel, make sure the measurements of the garage opening are spot-on. An off measurement is the most frequent reason for a door that doesn’t align perfectly, and industry experts caution that a discrepancy as small as a ¼ inch can trig a cascade of trouble, from uneven gaps to premature wear on the hardware.
- Use High-Quality Materials
Opt for sturdy materials and you’re buying more than just a door; you’re investing in long-lasting garage doors installed for optimal performance. Quality garage doors, especially insulated ones, can trim energy bills by as much as 20% a year by keeping the out-and-in air where it belongs. So, it’s not just a one-time expense; it pays you back every heating and cooling season.
- Professional Assistance vs. DIY
Going the DIY route can put a few bucks back in your pocket, but a less-experienced hand usually spends 8 or more hours on the task. Pros, in neat 3- to 6-hour blocks, finish faster and with fewer mistakes, plus they back their work with a guarantee you won’t have to worry about later fix-up costs.
- Proper Tools and Equipment
Gather the right tools before the first rung of the ladder goes down to ensure a smooth installation of the garage door opener. You’ll want a power drill, a level, a sturdy ladder, and all your safety gear handy. Research shows that more than 40% of DIYers fall behind because they’re hunting for missing tools, and when you improvise, quality can miss the mark entirely.
- Safety Precautions
テンションスプリングを含むガレージドアは、注意して扱わなければ深刻な危険を伴います。データによると、スプリングの事故により米国では毎年1万件以上の負傷者が発生しています。製造元の安全指示に常に従い、個人の傷害を防ぐために手袋と保護メガネを必ず着用してください。.
- 気象条件とタイミング
天気予報が晴れている日に設置を計画してください。風、雨、または高湿度は作業に支障をきたし、一部の敏感な部品を損傷させる可能性があります。設置環境に関する研究によると、悪天候は必要な時間とエラーの可能性の両方を増加させることが示されています。.
- 製造元の指示に厳密に従う
すべてのガレージドアは、順序に従って実行しなければならない独自の手順セットで設計されています。単一の詳細を見逃したり、重要なポイントを誤解したりすると、ドアの機能が低下したり、故障したりする原因となります。過去の設置の分析によると、深刻な問題の4分の1は、製造元が提供するガイダンスの精度を省略した結果であることが示されています。.
これらの要素に細心の注意を払い、状況が不明瞭な場合は専門家に相談することで、設置が安全かつ効率的になる可能性が高まります。.
設置に必要な工具と機器
セクショナルドア設置に必要な必須工具
セクショナルガレージドアを設置する際には、いくつかの専用工具が、イライラする一日とスムーズでプロフェッショナルな仕上がりの作業との違いを生み出します。頑丈な電動ドリル(金具を固定するため)、水準器(すべてが完全に垂直および水平であることを確認するため)、および長い巻尺(各パネルとレールが正しい長さを保つため)が必要です。レンチセット、マイナスドライバーとプラスドライバー、ラジオペンチは、さまざまな留め具に対応し、各パーツを問題なく締め付け、調整し、固定します。安全性は決してオプションではないため、安定した踏み台と頑丈な手袋も準備に加えてください。これらは、最も高い場所に手を届かせ、エッジや留め具から手を保護するのに役立ちます。開始前にこれらの工具をすべて揃えておけば、最初のパネルから最後のヒンジまで、自信を持ってスムーズに作業を進めることができます。.
安全装備の要件
いかなる設置プロジェクトにおいても、安全性を優先することは譲れません。まず、鋭利なエッジから保護するための耐切創手袋と、飛散する破片から目を守るための安全ゴーグルから始めてください。落下した工具や濡れた表面での滑りから足を守るために、頑丈で滑りにくい履物を着用してください。高所作業を行う場合は、落下物から頭部を保護するためのヘルメットと、万が一滑落した場合に身体を固定するためのフルボディハーネスを追加してください。また、耳も無視しないでください。騒音の大きい工具を使用する際は、聴力損失を防ぐためにイヤーマフまたは耳栓を使用してください。これらの基本装備を身に着けることで、安全で生産性の高い作業現場の基盤を整えることができます。.
スプリング調整用の専用工具
スプリングを微調整する際には、その作業のために特別に設計された工具に頼ることが極めて重要です。例えば、スプリングテンション工具は、制御された方法で力を加え、リスクを負うことなくスプリングの負荷を調整できます。これとトルクレンチを組み合わせることで、ナットとボルトを正確なトルク仕様に締め付け、過度な締め付けや緩みによるねじ山の破損を防ぎます。組み立てや取り外しの際には、スプリングコンプレッサーまたは頑丈なクランプを使用してコイルを安全に保持し、次のステップに集中できるように固定します。これらの器具は、時間を短縮するだけでなく、指や部品を無傷に保ち、作業現場と家庭用ガレージの両方で必須です。これらの工具を本来の用途に従って使用することで、アセンブリ全体を長期間にわたってスムーズに動作させ続けることができます。.
設置の準備
現場評価と測定
徹底的な現場評価と慎重な測定は、効率的な設置の基盤を築きます。まず、設置場所を調査し、使用可能なスペース、支持構造の健全性、温度や湿度などの周囲環境に細心の注意を払います。現場の寸法、必要なクリアランス、および梁、ダクト、配管など、最終的な配置に干渉する可能性のある障害物を記録します。これらの詳細を既存のシステムと照合して互換性を確認し、位置ずれや性能低下のリスクを排除します。この情報を収集して分析する時間を取ることで、遅延や手戻りの可能性を最小限に抑える、明確で実行可能な設置計画を作成できます。.
構造および電気的考慮事項
構造および電気システムを含む設計では、フレームと基礎が新しい機器によって導入される荷重を適切に支えられるかを検証するための徹底的な分析が出発点でなければなりません。これは、梁、柱、アンカーの選定を確認し、溶接部とボルトがエッジ破壊、せん断破壊、または座屈破壊を起こさずに連携して機能することを確認することを意味します。同時に、電気設計は既存の電力網と照合する必要があります。定格負荷とピーク負荷が供給容量と一致していること、相電流と中性線電流が定格制限内であること、絶縁と接地が関連規格に準拠していることを確認します。ヒューズまたはサーキットブレーカーで導体を保護し、専用の配管経路を敷設することで、故障電流を封じ込めます。構造チームと電気チームの間の定期的な連携により、コンジットやケーブルトレイのための構造的な切り欠きが部材強度を損なわない場所にのみ設けられるようにし、堅牢で効率的なシステムを実現します。.
作業スペースの準備と安全設定
まず、すべての工具と機器を、それぞれに指定された場所を設けて配置し、迅速な取り出しと片付けを可能にします。一目で簡単に読めるラベルを使用してください。作業スペースの隅々まで明るく照明が行き渡り、特に精密作業や危険物が存在するエリアでは空気が自由に循環するようにしてください。床や壁に、原材料、完成品、および危険物を配置する場所を明確に線引きします。これにより、エリアを整頓し、エラーのリスクを低減します。これらのゾーンには、十分に備蓄された応急処置キット、機能する消火器、および目立つように表示された非常口を補完してください。すべてのチームメンバーが安全手順と必要な個人用保護具の着用に自信を持てるよう、実践的で反復的なトレーニングを提供してください。.
ステップバイステップの設置手順
ボトムパネルとレールの取り付け
ボトムパネルとレールを取り付けるには、まずパネルを目的の位置に慎重に設置します。次に、レールをパネルの端に沿って配置し、正確に位置が合っていることを確認してから、付属のネジまたはボルトで固定します。次の組み立て段階に進む前に、すべてが水平であり、各接続がしっかりと締まっていることを再確認します。.
後続のパネルとヒンジの追加
次のパネルをレールにスライドさせ、隙間が均一になるように注意深く位置を合わせます。次にヒンジを取り付けます。各ボルトを締めるたびに、ジョイントが自由に動き、しっかりと固定されていることを確認します。一歩下がって、各パネルとレールの平面を再確認してから、次のセグメントについて同じ手順を繰り返します。.
最終調整とテスト
小さな調整を行います。隙間がずれている箇所にはシムを挿入し、ストップを再調整して動きが適切になるようにします。アセンブリ全体を3~4回動作させることで、後で悪化する可能性のある問題を発見できます。最後の再締め付け後、最終チェックリストを確認します。ガタつきやがたつきがなく、すべてのラッチがぴったりと収まっていることを確認します。.
設置中の安全上の考慮事項
セクショナルドア設置の危険性を理解する
セクショナルドアの設置には、注意事項が厳守されない限り、負傷や物的損害を引き起こす可能性のあるリスクが伴います。ドアのセクションとスプリングは重量があります。これらを誤って扱うと、ほんの一瞬でも、落下や挟まれによる負傷につながる可能性があります。テンションスプリングが誤って取り付けられた場合、蓄積されたエネルギーが激しく放出され、骨折やその他の深刻な外傷を引き起こす可能性があります。取り付け時のわずかな位置ずれでも、ドアのバランスが崩れ、落下、詰まり、または押しつぶしを引き起こす可能性があります。適切な個人用保護具を使用し、留め具を再確認し、設置マニュアルに厳密に従うことで、潜在的な危険性を低減できます。圧力や位置合わせの許容範囲に自信がない人は、訓練を受けたガレージドア技術者を雇うべきです。彼らの経験は、現場での危険な見落としの可能性を大幅に減らします。.
専門家を呼ぶべき時
何かを設置する手順が予想よりも複雑に感じられ始めた場合、または適切な工具がない場合は、通常、専門家を呼ぶ方が賢明です。これは、ドアが安全に持ち上げるには重すぎる場合、フレーム自体の補強が必要な場合、または配線や回路が作業の一部である場合に特に当てはまります。これらの領域には、訓練された手に任せるのが最善のスキルと機器が必要です。同じことは最新のテクノロジーにも当てはまります。スマートシステムや精密機構は、製造元のガイドラインに従ってセットアップされたときに最適に動作します。専門家に作業を任せることで、待ち時間が短縮され、すべてが規格に準拠していることが保証され、設置が長年にわたって持続します。最後に、作業が自分の経験や快適さの範囲を超えていると感じた場合、専門家の手による対応は、自信と信頼性の高い結果の両方をもたらします。.
重量パネルの適切な持ち上げ技術
重量パネルを扱う際には、適切な持ち上げ方法に従うことが安全性と生産性にとって極めて重要です。まず、パネルの重量とサイズを確認します。自分一人では扱いきれないと思われる場合は、同僚を呼ぶか、機械的な補助具を使用してください。足を肩幅に開き、膝を曲げ、腰を下ろし、背中をまっすぐで支えられた状態に保ちながら、脚で作業を行います。パネルの端を両手でしっかりと握り、スムーズで均一な動きで持ち上げ始めます。急に引っ張ったり、持ち上げたりしないでください。歩くときは、足を目標に向けておきます。体をひねるのではなく、短く意図的な歩幅で歩きます。パネルが特に幅広であったり、形状が扱いにくい場合は、リフティングストラップ、ハンドトラック、またはパネルラックを使用するのが賢明です。自分の直感を信じてください。パネルが自分の力や快適さを超えていると感じたら、助けを求めてください。プロセスを賢く保ち、身体を安全に保ち、作業を進めてください。.
一般的な問題とトラブルシューティング
位置ずれと動作上の問題の特定
位置ずれや動作上の問題は、多くの場合、設置ミス、摩耗、または機器に作用する予期せぬ力に起因します。位置ずれしたシステムは不均一な圧力を発生させ、効率の低下、振動の増加、または異音を引き起こす可能性があります。まず、不均一な隙間、緩んだ金具、または傾いた部品がないか確認し、すべての留め具がしっかりと締まっていることを確認します。動作上の問題は、通常、部品の故障、ソフトウェアの誤動作、または動きを妨げる物理的な障害物に関連しています。定期的なテストを含む定期的なメンテナンススケジュールを実施することで、これらの問題が深刻化する前に発見し、システムをスムーズに動作させ続けることができます。これらの手順で状況が改善されない場合は、製造元の技術文書を参照するか、資格のあるサービス技術者に連絡して、徹底的な診断と修理を依頼してください。.
騒音とケーブルアライメントの問題への対処
騒音とアライメントの問題を無視すると、システムの寿命と効率が大幅に低下する可能性があります。騒音は通常、ベアリングの乾燥、部品の傷、または適切にボルト締めされていない何かなど、より深刻な問題が発生していることを警告します。騒音を抑えるには、すべての可動部品に摩耗の兆候がないか確認し、潤滑が適切に行われていることを確認する必要があります。一方、ケーブルのアライメントは、張力が緩すぎるかきつすぎる場合、配線経路が鋭利なエッジに接触する場合、またはシースが徐々に薄くなる場合に問題が発生します。ケーブルを真っ直ぐに保ち、適切な張力に保つことが、システムを問題なく動作させる鍵です。問題が深刻化する前に、ケーブル経路のよじれ、障害物、摩耗箇所を確認してください。これらのチェックを定期的に行うスケジュールを設定すれば、多くの時間や費用がかかる前にトラブルを発見できます。.
ウェザーシーリングの問題と解決策
シーリングの弱点は通常、経年劣化、設置ミス、または過酷な環境から生じます。典型的な症状は、漏れ、隙間風、不十分な断熱であり、これらはすべてシステムや建物を危険にさらします。トラブルシューティングは、ゴムガスケット、シリコンシール、または古いコーキングなどの擦り切れたり劣化した要素を特定することから始めてください。これらを、UV耐性と耐湿性に優れた高グレードの材料に交換することで、保護性能が向上します。すべての継ぎ目やエッジが正しく装着されていることを確認し、ひび割れや収縮がないか定期的に目視検査を計画してください。さらに長寿命を求める場合は、腐食、紫外線、熱サイクルを防ぐ撥水塗料や膜の使用を検討し、シールが長期間持続するようにしてください。.
セクショナルガレージドアのメンテナンス
長寿命のための定期的なメンテナンス作業
セクショナルガレージドアの定期的なメンテナンスは、特にドアの高さ調整が必要な場合に、年々スムーズに動作し続けるために不可欠です。まず、ドア表面を優しく洗浄して汚れやグリースを取り除きます。清潔な外観は見た目が良いだけでなく、錆や汚れの防止にも役立ちます。次に、すべての可動部品(ヒンジ、ローラー、レール)を動作中に検査します。曲がった部品、曲がったレール、または不均一な摩耗の兆候がないか確認します。適切な場所にシリコングリースまたはリチウムグリースを2~3滴垂らすと、滑りが良くなり、ほこりが付着しにくくな.
Signs That Require Professional Help
While routine upkeep can nip small troubles in the bud, some sectional garage door hiccups make calling a pro the safest and smartest approach. Take a grinding or scraping noise that crops up during opening or closing: it probably means the tracks or rollers are bent or out of line and need a technician’s seasoned eye. If the door still sticks or jerks after you’ve cleaned and lubricated all the usual spots, the torsion or extension springs may be to blame; these are tough coils that can snap with enough force to cause injury. Look, too, for trouble signs you can’t fix with a screwdriver: bent door panels, worn cables, or spiderweb cracks in the material. Should the opener unit suddenly stop responding, or start acting like it’s possessed, the problem might be a sensor, motor, or a wiring glitch that’s beyond DIY fixes. Getting these troubles sorted by a qualified repairperson right away keeps the door running right, protects your vehicle and belongings, and helps the entire system last for years.
Best Practices for Door Maintenance
Regular care is key to keeping your garage door working well for years. Begin your routine by checking the hinges, rollers, and tracks for rust, cracks, or sign of fatigue. Apply a high-grade silicone or lithium grease to every moving part; a light film is enough to lessen friction and stop parts from sticking. To gauge the door’s balance, unplug the opener and lift the door halfway by hand—it should remain in place; if it swings quickly or won’t stay put, it may need realignment. Clear the tracks of dirt, leaves, or toys, and wipe them with a damp cloth to avoid future snafus. Lastly, every few months, test the safety sensors and the auto-reverse function by placing a roll of paper towels in the path of a closing door; it should reverse immediately upon contact. Following these easy steps each season will help avoid expensive fixes and prolong your door’s service life.
よくある質問(FAQ)
What does sectional door installation involve?
Sectional door installation involves fitting a door comprised of individual horizontal panels joined by hinges. When the door opens, the panels travel vertically upward. This design conserves floor space, making it ideal for residential garages and commercial facilities.
What steps are needed to install a sectional garage door?
Installing a sectional garage door typically starts with measuring your garage opening, then assembling the door panels, fitting the vertical and horizontal tracks, and connecting the opener mechanism. Always consult the manufacturer’s instructions for dimensions and torque specifications best suited for that model.
What advantages do sectional overhead doors provide?
Sectional overhead doors are valued for their space savings, thermal efficiency, and robust security. Since the panels glide along ceiling tracks, they require minimal overhead clearance—perfect for buildings with low clearance or overhead obstructions.
What factors should I weigh when selecting a commercial door?
Assess the door type, door frame dimensions, insulation needs, and material choices—steel and aluminum are popular for strength and resistance to impact and weather. Additionally, consider expected traffic volume and any security specifications the site demands.
How can I keep my sectional door in good shape?
To keep your sectional door working well, make a habit of checking moving parts, lubricating hinges and rollers, looking for dents or rust on the panels, and testing the door opener regularly. Small fixes now can save you bigger headaches later on.
What steps are needed to put in an overhead garage door?
To install an overhead garage door, you start by getting the opening ready, then you put the door panels together, hang the tracks, and hook up the opener. Keeping everything straight and evenly spaced is the key to smooth lifting and lowering of the garage door opener.
Can I find manuals for installing sectional garage doors?
Absolutely—most manufacturers include a full installation manual with sectional doors. These manuals have clear steps and labeled pictures that make it easier to get the door up safely and correctly.
What problems might I run into while installing a sectional door?
The most common bumps in the road are crooked tracks, not enough overhead space, and tricky torsion spring setups. If you hit a snag, it’s smart to call a local overhead door expert for a hand.
自分でセクショナルドアを設置することは可能ですか?
はい、適切な工具を備え、設置マニュアルに注意深く従えば、多くの住宅所有者が自分でセクショナルドアを設置することができます。ただし、ドアシステムに詳しくない方には、適切な設置とメンテナンスを確実に行うため、専門業者に依頼する方が良い選択肢となる場合があります。.
手頃な価格で優れた品質の産業用セクショナルオーバーヘッドドアの購入をご検討中なら、SEPPESブランドの産業用 セクショナルオーバーヘッドドアをご覧ください.
参考資料
1. MINER Corporation
- ウェブサイト: MINER Corporation – セクショナルドア設置
- 製品説明: このサイトでは、セクショナルドアの設置、メンテナンス、修理に関する詳細な情報を提供しています。様々なタイプのセクショナルドア、その特徴、設置プロセスについて解説しており、セクショナルドアの技術的側面を理解する上で貴重な情報源です。.
2. Transparency Market Research
- ウェブサイト: セクショナルドア市場レポート
- 製品説明: このレポートは、設置動向、材料タイプ、市場予測を含むセクショナルドア市場の包括的な分析を提供しています。業界におけるセクショナルドアのより広い文脈を理解するのに役立ちます。.
3. Twin City Garage Door Co.
- ウェブサイト: セクショナルガレージドアガイド
- 製品説明: このブログは、設置のヒント、ドアの種類、メンテナンスのアドバイスを含む、セクショナルガレージドアに関する徹底的なガイドを提供しています。住宅用および商業用の両方の用途において実用的な情報源です。.
4. Sweets Construction
- ウェブサイト: Sweets Construction – セクショナルドア
- 製品説明: Sweets ConstructionのこのPDF文書は、セクショナルドアの仕様と設置手順を提供しています。技術的な詳細と設置ガイドラインに関する信頼できる情報源です。.
5. Barton Door
- ウェブサイト: Barton Door 設置手順書
- 製品説明: この文書には、住宅用セクショナルドアの設置手順が含まれています。設置手順と基準を確認するのに役立つ実用的なガイドです。.
関連記事


コンテナに設置可能な断熱セクショナルドア
断熱セクショナルドアは、コンテナの設計や改装において優れた選択肢です。これらのドアは、セキュリティを提供するだけでなく、…
続きを読む